Dynamic Mosaic -
Help Dynamic Mosaic -
Help |
Dynamic Mosaic -
Help
Mosaic settings
The
mosaic
creation has a couple of basic settings for size and colour matching. When the button
'Show Controls' is pressed a small pop-up window is
opened with the Mosaic settings
.
The top box provides the settings for colour and
quality, the bottom box for size and shape.The following settings are
available: Settings
example Example of tweaking the cell
size, the amount of tile and the aspect ratio to a good fit with the monitor
size. Suppose the
monitor has 1650 x 1050 pixels, thus an aspect ratio of 11:7, a very uncommon
value. The mathematical value would then be 11/7 =
1.57. We first prepare a source picture with this aspect ratio. This
is the picture we will use (dimensions: 825 x 525 pixels): To match the source picture
size and all the mosaic settings to precisely fit the full mosaic on this
monitor can be calculated as follows: Approach 1: We start
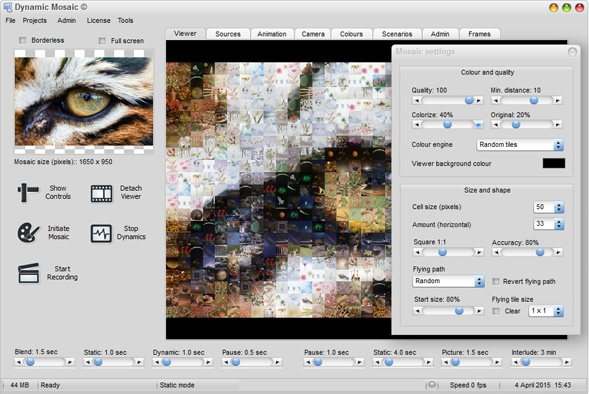
with a trial and error mosaic creation. We start with a tile size of 50, thus
1650/50 =
33 tile son the horizontal, and therefore 21 on the vertical. The
amount of tiles are integer numbers so we can expect that the mosaic
will fully cover the screen, with no black edges top/bottom or left/right. This is the
first mosaic result: The
mosaic is quite good, also because of 40% colorize and 20% original
blend. Approach
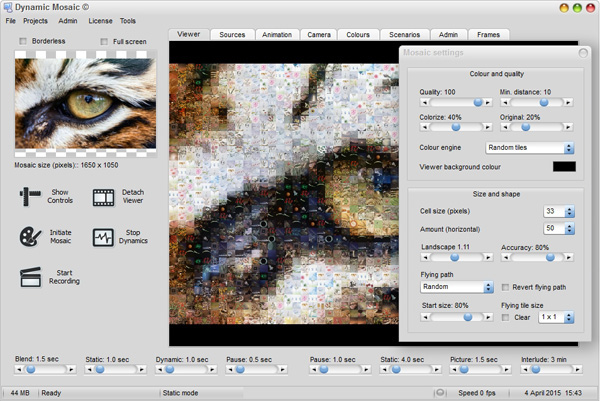
2: We start
with the amount of tiles: 50. This will lead to a cell size of 33, which fits on
the horizontal (1650/33 = 50), but won't fit on the vertical: 1050/33 = 31.8.
Since the application uses normal rounding-off maths the amount of tile on the
vertical will become 32. This combination will lead to a slightly lower aspect ratio, resulting
a small black lines left and right of the mosaic on the monitor: the mosaic size
will be 1650 x 1056 pixels (32 x 33 =
1056). Although 3 pixels
left and right can basically be ignored, we can still repair some of this
'damage' by tweaking the aspect ratio of each tile. We will now increase the aspect ratio
step by step. At first nothing happens with the mosaic size (this can be found
below the miniature picture top-left of the GUI) because the number of tiles
on the vertical will still not change to a different number. When the aspect
ratio reaches the value of 1.11 the mosaic size is then perfectly set to 1650 x 1050
again. See screen shot below. When the initial mosaic is now
created and saved you will notice that the mosaic size is exactly as indicated:
1650 x 1050. It will now perfectly fit on the monitor screen again. The tiles
are slightly landscape but this should be not a problem. Most importantly:
because the amount of tile on the horizontal is significantly higher than the
first approach the overall impression of the mosaic is extremely
accurate. 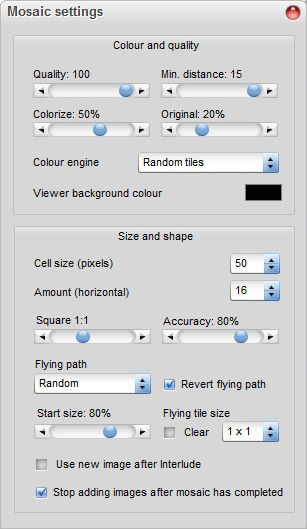
Quality: the accuracy of how many tiles are used for a
tile selection. A lower quality results in a higher speed but also a slightly
less colour matching of each tile with the source picture colour. A good value is
80%.
Minimum distance: the minimum allowed distance between the same
tiles in the mosaic. This is a target value and may not be
chived for all tiles. In case when e.g. large areas of similar colours are part
of the source picture (e.g. blue sky), there may bot be enough well-fitting
pictures in the library to cater for the minimum distance, and
the pictures may be placed next to each other after all. A good value
is 10-12 tiles.
Colorize: the mosaic takes the colour of the source picture but keeps
the luminance of the tiles. This way a very good colour matching can be achieved,
but at the cost of looking awkward because tiles gets an unnatural colour (specially
people faces may look weird if colorize is set to a
high value). A good value is between 30 and 50%.
Original: the amount of
blending with the original picture. This blend should be set to low values to
avoid that the source picture is peeking through too much, obscuring the
individual tiles. The source picture is always blurred before it's blended,
effectively also removing the sharp resize edges. For this reason a too large
source picture is not required because the blurring will also reduce the
resizing pixelation is for instance the mosaic size is 1920 and the source is
600 pixels in size. A good value is between 15 en 25%.
Colour engine: this is the
engine that is used to define the tiles for the mosaic. There are 4 engines
available, each having an advantage and some disadvantages
Random tiles: the tile is
selected from a small range of best fitting tiles, not always the best fit
is selected. Advantage: randomly selected tiles will certainly avoid that
many same best fit tiles will not be placed adjacent to each other.
Disadvantage: adjacent tiles are not managed, so in large similar coloured
areas adjacent tiles may frequently occur.
Optimized distribution: from the
randomly placed layout a repair 'wave' is started to remove adjacent tiles,
and replace them with similar tiles, also best fitting. Advantage: adjacent
tiles will be less, but patterns of tile ares may occur. Output is not
predictable. In some cases this engine prevails over the 'Random tiles'
, but equally vice
versa.
Force
to use all pictures: this engine will relentlessly use all the pictures in
the current library (only at start when creating the initial mosaic). This
may have severe consequences: when the amount of library pictures is
almost equal to the required amount in the mosaic the result can look drastically
awful. When the amount of pictures is very low, e.g. a factor 5
lower, the result can be pretty nice, but still worse as with the previous two
engines. The advantage is that all pictures are used (in case the client
wants to show all pictures in the library for some reason), the disadvantage
is obvious: little colour matching ability. There may be a good reason
for ruining it anyway: when starting with an awfully bad colour
matching, and new library files are provided by snapshots, the mosaic can be
improved with each new picture. This would be a nice effect,e.g. to reveal a
new logo or to start a little contest of who will identify the text that is
written in the mosaic (and is slowly revealed with each new
tile).
Full randomization: the application will not make a
colour matching mosaic, but simply randomly build a mosaic from a randomly
selected tile. Th end result is a mosaic that has no resemblance to
whatsoever. Advantages: like with 'Force to use all
pictures' this can be used to slowly build a mosaic.
Disadvantage... no mosaic?Cell size
(in pixels): the size of each tile ('cell') in the mosaic. The size is
quite important: to large will result in a very large mosaic, perhaps too
large to fit in the monitor, and resizing will result in smaller cell size
anyway. So to set the correct size is a matter of taking the monitor size also
into account. Too small will result in a bad picture quality, where individual
tiles can hardly recognized. A good size
is 32-60 pixels.
Amount
(horizontal): the amount of tiles on the horizontal size of the mosaic. The
amount of vertical tiles is automatically calculated from the aspect ratio of
the source picture. Also here the amount is quite important: too many tiles
will results in a large mosaic, but quite good matching with the source, but
too little amount will result in a decrease of mosaic likeliness with the
source
picture.
Aspect ratio: the width:height ratio of each tile in the mosaic. It is good practice
to use the same aspect ratio of each tile as that of the source picture, but
all options are equally interesting. At the end it's a matter of taste.
Revert flying path: the default
direction is to start large, and then fly into the mosaic. When this option is
checked the path reverts: it starts small, gradually flying out and then fades away.
Flying path: this is the way the tile will move from full screen to the final destination and size.
There are three different paths; and a fourth option to randomly select
a path movement. Default is 'Random'.
Accuracy: this parameter is comparable
to the 'Quality' parameter of the mosaic.
It is basically an indicator to what extent the perfect fit of the new
snapshot 'tile' placement may deviate. This is particularly useful
when e.g. a booth with a constant colour background is used, and with
little colour variation, and each snapshot would then be placed in always
the same optimized place in the mosaic. To avoid such a repeated placement, a
more randomly selected fit (but still a good fit) is allowed. The value of
accuracy has not best value. It's a bit trial and error what could be a good
value. A good starting value however is 60-80%.
Start size: the percentage of the full screen size when a tile is shown.
A value of 100% means that the tile is filled until the monitor screen is
almost fully showing the tile. It will anticipate on landscape and portrait
aspect ratios/ A 100% value still leaves a small rim between the monitor
edges and the tile. The range is between 100% and 20%.
Flying tile size: several tile 'clusters' can be activated. The default is 1x1 tile
(or simple one tile at the time), but also 2x2, 3x3, etc can be selected ('manifold
tiles'). The advantage is that mosaic build-up goes faster. When a manifold is
selected (so: no 1x1 tile) the initial mosaic is not shown
and replaced by an uniform colour of the selected background
colour (default: black). In this case the mosaic is gradually being built-up. Some aspects to understand:
Make an estimation of how
long the mosaic completion will take, and set the timer for the commercial
('Interlude') to a value far greater than the time to complete the mosaic.
When a commercial starts also a new mosaic will be made, possibly
not having completed the old one.
Upon completion of the
mosaic the commercial will be activated automatically. This is to draw
attention at completion, providing an excellent moment to show the sponsored
messages. After the message a new mosaic is generated, recoloured and
mosaic build-up starts all over again.
The manifold tile
combinations will be placed randomly; so with each dynamic step it's
unpredictable which part is being placed.
When the number of
manifolds does not fit in the current mosaic size, the right and bottom
edges are partly repeated. For instance when the mosaic size is 24 x 18
tiles, and the 4x4 manifold is selected, the number of horizontal tiles is
24/4 = 6 parts, but the vertical tiles need one more to fill the 2 remaining
tiles: 18/4 = 4 tiles of 4x4 + 1 tile of 4x4 overlapping 2
rows.
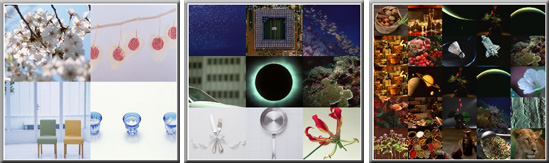
Picture above: manifolds in a frame. From left to right:
2x2, 3x3 and 5x5 pictures
Clear: the mosaic will be wiped after initialisation and
fully replaced with the currently active background colour. This way a mosaic
can be build-up from new pictures, or from existing pictures in the currently
active library folder. More information is provided in the chapter on 'Recipes for dynamics'.
Use new image after Interlude: by default the
mosaic is not rebuilt
with a new random image after an Interlude has finished. To allow this feature,
you first need to activate this option here, so a new mosaic image
will be used after an Interlude action.
Stop adding images after mosaic has
completed
: in some cases, e.g. after starting
with a clean viewer (so: no mosaic yet, which is being built up during
the event), you can stop the mosaic of replacing tiles with new
images. The process is not really stopped: the flying in/out is suppressed and
also the shape dynamics trigger is suppressed. It's recommended to test this with a
small mosaic size, e.g. 8 tiles on the horizontal, and highly paced
image dynamics. Only then you are sure that during an event the image is
not erased, restarted or otherwise replaced. When this option is active, the amount of
placed and total tiles is indicated in the GUI. To be sure no accidental
erasing happens, the techie should stop the mosaic dynamics after the mosaic has
been completed, and use the 'Test animation' button to manually invoke shape
animations.